Saturday, July 30, 2011

Book light revisited with details...

Gosh, thank you for the comments and interest in my booklight! You all made my day! And as requested, here are some more photos and details so you can go make your own. (And if you do, I would love to have you link back and let me know so I can see your version.)


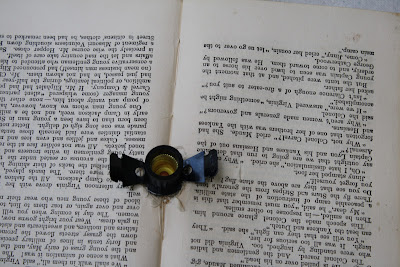
Here is the inside of the book with the light socket pulled through it.  The metal flanges are bent out after pulling the socket throught the hole.   The light socket is one of those make your own light kits.  They are designed so that you can buy one of the multiple light shades sold seperately to use with it.  (Bought mine at Menards, but I know that they are available at any of the big home improvement stores.)  This is also what I use to make lights out of  vintage canning jars.  I think I would have liked a simple round bulb but they only had flame shaped ones with the frosted coating.  There are less choices available with LED lights.  Note also that the socket is the smaller size.


Pull the socket through and extend the flanges out.


Here it is resting inside the book.  The flanges keep the book open around the bulb.


I cut a rounded notch in some pages and glued them over the top.  You have to do this while the light is hanging to get it to fit right...


And another close up of the light hanging.


I used a dropcloth canvas patch to cover the hole in the spine of the the book, then covered the cord with a strip of this fabric glued together.  I can imagine lots of variations for dealing with this...


And here it is again, hanging over my desk nook.  I just used a screw-in wall/ceiling hook and the on/off switch keeps it from slipping through.  The book is light so I didn't worry about stressing the wire and creating a fire hazard.  Disclaimer:  No guarantees this is safe.  Decide for yourself whether this is something you feel safe having in your house.  Absolutely do not use a regular light bulb for this or you WILL create a fire hazard with heat and old paper in close proximity!)


Taa Daa! 

Hope this answers your questions.  If not, let me know and I will try to provide any additional information you might want.

Wednesday, July 27, 2011

Not your usual book light

I am a book lover.  I can't imagine using an electronic reader because I enjoy the whole experience of reading.  This includes the touch and smell of books as well as the story being read.  It took me awhile to gather the strength to rip the covers of old books, but I did it.  I love the bundles of semi-destroyed books for decorating spaces. 

I have more old books than I have spaces for at the moment.  And then I had an idea.  (Sometimes these work, sometimes the don't).

I grabbed my husband and went out to the shop with an old book.  I had him show me how to use his drill press.  (Awesome tool, I need to find some other projects so I can play with his drill press a bit more.)  I drilled a hole in the spine of a book.  He told me it would just shred the book, but it atually made a very nice hole.  Can you guess why I needed a hole in the spine of a book?  How else would I get the light socket in place?

Here is my book light!  What do you think?  It is an LED light, so no heat and little fire hazard.  I figured if people could use coffee filters and other flammable items, I could use a book.  I am working on a cord cover but I was too excited to wait until that was finished to share this.


I have my desk in a nook in the dining room and wanted a light hanging over the desk.


See my pile of 'destroyed' books.  This desk is more storage than major work space so I didn't need really good desk lighting.  Just a book light...

I think I like it.  And I haven't seen one before, so it might be original.  It is original in my world.  There are so many things I see and copy but lately I have felt the need to be a bit more original.  It felt good to make something that came out of my imagination. 


Creating spaces that are uniquely my own helps fuel that creative spark.  Don't you just love it when ideas start forming in your head and you can't wait to get busy and see if you can create what you imagine?   This space makes me smile and the book light just topped it off. 

Adding my project to these blog parties:


The Shabby Creek Cottage

Beyond The Picket Fence


          French Country Cottage

vif187


Funky Junk's Sat Nite Special

Summertime jewels and treasures

Gooseberries are like jewels.  The ripe ones are somewhat rare--it is very difficult to beat the birds to the ripe berries.  But this summer I did it!!  And the color and translucence of gooseberries make them jewel-like.  I didn't even know that they did ripen to a dark red with a sweet easy to eat taste.  I suspect that gooseberries are often picked while green because that is the best way to beat the birds!


Gooseberries can be a bit difficult to pick.  The branches are a bit thorny.  The berries grow along long drooping branches and it is easiest to lift up the branch as you pick the berries off of it.  As I was cruising through the bushes I found another treasure.


Isn't it such a sweet little nest!


I was busy taking pictures from different angles.  Admiring the nest.  Thinking I might have to save it once fall comes and it will be destroyed by our harsh winters. 

And then I discovered it had not yet been abandoned.


Treasures within a treasure.  Definitely summertime treasures and jewels.  My kind of riches.

Now to see if I can discover what kind of bird built this nest and laid her eggs.  Do you know?

Tuesday, July 19, 2011

Perfection

Introducing Lydia Kathleen
My first grandchild


She was born July 18th in the afternnon.  Lydia and her mother ( and father) are doing well.  There are lots of smiling faces in the family.  Looking forward to introducing her to great great grandma and taking some 5 generations pictures!

Sunday, July 17, 2011

Lovely


Hope you are enjoying your Sunday.  We have hot humid weather.  I find it simply lovely. 

arose4

Wednesday, July 13, 2011

I joined the chalk paint bandwagon…

Do request somewhat unusual birthday presents like I do?  I asked for Annie Sloan chalk paint *bought at for my birthday—and I got some!  (as well as the collection of labeled barbwire samples I also requested…)
I agree with all the bloggers who have exclaimed over the virtues of this paint!  It really makes creative painting easier and more fun.
My first completed project is a picture display board.

Really Rustic
a1
Shabby Chic, less rustic.
aa3
I am still loving the shabby chic clothes pins.    The beautiful bride and handsome groom are my son and daughter-in-law.  They are expecting my first grandchild any day now….  (Can’t wait for that phone call, and the first time I get to hold my granddaughter!!)
a2
The cards hanging from this second board are from a set of horse tarot cards.  (The Way of the Horse and The Tao of Equus are books by Linda Kohanov from which these cards evolved.  If you love horses and are into self understanding and self improvement these are really enjoyable books to read,)
aa5
For this project I simply painted a board, sanded some spots, and waxed.  I love the old weathered look it produced on the old board.  It is interesting how a little bit different process creates a different look on a smooth new board.  The newer board, I rubbed the paint after it dried which brought out different tones within the paint.  Working with this paint really reminds me of working with chalk pastels.  (Hmm, can you make paint with chalk pastels?  is that part of the secret of this paint?)

a4

aa4
This is an easy project,  Drill a couple of holes in a board, use 18 gauge wire inserted through the holes and secured in back, shabbify some clothes pins to hang the pictures or ephemera, secure picture hangers on back and hang on a wall.  I can think of so many ways this project could be personalized or modified to fit different room designs. (Etsy anyone? )
aa5
I am linking up to these great blogs for their blog parties:


Transformation Thursday

Beyond The Picket Fence

Todays Creative Blog


Chic on a Shoestring Decorating

My Repurposed Life